Docker for the busy researcher
19 Apr 2018Why Docker?
Have you ever been frustrated because a software package’s installation instructions were incomplete? Or have you wanted to try out software without going through a complex installation process? Or have you wanted to execute your software on some remote machine in a defined environment?
Docker can help.
In my group, we use Docker to make sure that our code compiles properly in a defined environment and analyses are reproducible. We automatically create Docker images through Dockerfiles. This provides a clear list of dependencies which are guaranteed to work starting from a defined starting point.
Once a Docker image is built, it can be run anywhere that runs the Docker engine.
Introduction to Docker
Have you ever seen someone boot up Windows on a Mac? That process of running one complete OS on top of another OS called running a virtual machine.

Docker containers are like virtual machines except that they share guest OSs, which makes them very lightweight. However, it’s still useful to think of Docker containers as virtual machines, because they feel like their own self-contained units.
Docker images are analogous to virtual machine images, and a container is analogous to a running virtual machine. There is a whole ecosystem around Docker containers, somewhat analogous to git repositories.
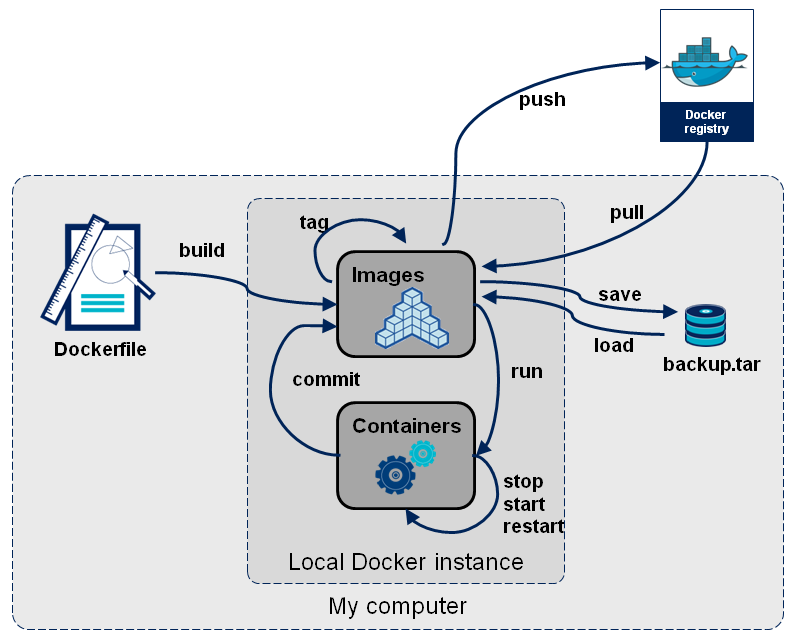
Docker Hub plays the role of GitHub (shown as a “Docker registry” above).
Pulling and running a Docker image
Let’s get our feet wet.
To follow along, you’ll need to install Docker, or if you are on a shared machine you’ll need to be added to the docker group.
First, note that I don’t have cowsay available on the machine running Docker:
» cowsay
zsh: command not found: cowsay
We aim to remedy this situation with Docker. First pull a Docker image:
» docker pull matsen/cowsay-test
Once that is done, start and enter the Docker container:
» docker run -it matsen/cowsay-test /bin/bash
root@5d2942f9d5e2:/test-cowsay# cowsay "Hello"
 _______
< Hello >
 -------
        \   ^__^
         \  (oo)\_______
            (__)\       )\/\
                ||----w |
                ||     ||
Note that my prompt on the host machine is » whereas that inside the container is root@5d2942f9d5e2:/test-cowsay#.
Explore around a little inside the container and note that you can’t see anything from your host machine.
Also, any modifications you make inside the container don’t change things on the host machine.
For the ultimate test of this, it’s fun to recursively remove everything starting at /, though of course be very careful that you are actually inside the container!
In any case, when you are done you can exit out of the Docker image.
If this all seems rather abstract, think of entering your Docker container as being like connecting to a remote computer.
You need to open a connection to the operating system inside the Docker container via the docker run command, just like you open a connection to your computing cluster via the ssh command.
In the next section, we’ll see how you need to create a share between the Docker container and your filesystem just like you would for a remote computer over the network.
Making a directory available inside of a container
As we have seen, Docker is designed such that changes inside the container are not reflected on the host machine. That’s perfect for some use cases, if you want to keep something, you typically want it stored outside of the container. For this Docker provides volumes.
To have a directory available in a Docker container, the syntax is
-v /host/path:/container/path
where /host/path should be replaced by the directory on the host machine you wish to make available, and /container/path is where you would like this directory to appear inside of the container.
For example, say we have a ~/foo directory that we would like available inside our container.
We can start a container and mount this directory like so:
» docker run -v ${HOME}/foo:/foo -it matsen/cowsay-test /bin/bash
Once we’ve mounted it we can do stuff that lives beyond our container:
root@2cdca42bc8d9:/test-cowsay# cd /foo
root@2cdca42bc8d9:/foo# cowsay "Hello foo" > output.txt
root@2cdca42bc8d9:/foo# exit
exit
» cat ~/foo/output.txt
 ___________
< Hello foo >
 -----------
        \   ^__^
         \  (oo)\_______
            (__)\       )\/\
                ||----w |
                ||     ||
Dockerfiles
Dockerfiles are complete instructions about how to build a Docker image. This makes them very valuable even for people who don’t want to use your software via Docker: they can read this document, knowing that it provides a complete set of installation instructions (especially if you are using an automated build as described below).
We will illustrate using an example cowsay-test repository that made the image we pulled above. The first line,
FROM ubuntu:trusty
states that the image should be built starting with the Trusty version of the Ubuntu Linux distribution.
This next section installs cowsay using apt-get (more on apt below):
RUN apt-get update -q && \
    apt-get install -y -q --no-install-recommends \
        cowsay
Then we link cowsay to a location from which we can execute it.
RUN ln -s /usr/games/cowsay /usr/bin
These FROM and RUN commands are Docker instructions; see the Dockerfile reference for more details.
Building a Docker image
Next we’ll build a Docker image from a Dockerfile. To follow along, clone the cowsay-test repository and enter that directory. To build the Docker image, use the command
» docker build -t matsen/cowsay-test .
This builds the Docker image we used in the previous section using the Dockerfile in the current directory.
Image names
So far we’ve been working with a Docker image named matsen/cowsay-test.
We used this both when we pulled from Docker Hub, and when we built it locally (using the -t flag).
This image name is composed of a user name matsen, and the name cowsay-test.
Names can also have tags.
For example, rocker/tidyverse:3.5 is tag 3.5 of rocker/tidyverse.
The latest tag is special: it is the latest version that was built without an explicit tag version (which may be different than the latest built).
A tiny bit about apt
We’re going to interrupt our discussion of Docker briefly to describe the wonderful apt package manager that was developed by Debian and adopted by Ubuntu (a Debian derivative). Here is a FAQ with common commands. This section is only relevant for base images based eventually on Debian or Ubuntu. If you have to use an image based on Red Hat (e.g. CentOS), then look up info on yum and/or DNF.
Here’s a good apt recipe:
RUN apt-get update && apt-get install -y --no-install-recommends \
    package1 \
    package2
Replace package1 and package2 with what your image needs.
To find what you need, do the following.
- Learn what version of Debian or Ubuntu you are using in your base image.
For example, if the base image is
debian:latestyou can go to the corresponding Docker Hub page to learn that this is Debianstretch. - Run your install until it says that it’s missing some package or header file. Say it’s
libpng. - Do a web search for
debian package libpng, which will take you to a page like this, telling you that there’s alibpng-devpackage. You can click onstretchto get more details on what’s up with that package in thestretchversion of Debian.
Tip: packages that end with -dev are generally the ones you want, because they install libraries with the corresponding header files that you can use for compilation.
Dockerfiles: making your own
Here we’ll extend our cowsay Docker image a little by extending its powers with wget.
Doing the steps above, we find that there is a wget Debian package.
So we can just add it:
RUN apt-get update -q && \
    apt-get install -y -q --no-install-recommends \
        cowsay \
        wget
Now, building and running our container as above, we win!
(Note that I’ve abbreviated the command line prompt to # below).
# wget --no-check-certificate -O docker.cow https://git.io/vpOr5
# cowsay -f /test-cowsay/docker.cow "w00t"
 ______
< w00t >
 ------
    \
     \
      \
                    ##         .
              ## ## ##        ==
           ## ## ## ## ##    ===
       /"""""""""""""""""\___/ ===
      {                       /  ===-
       \______ O           __/
         \    \         __/
          \____\_______/
I suggest iteratively building up your Dockerfile as follows:
- Start with a Dockerfile that doesn’t have everything you want, but does build.
- Build and enter the corresponding container.
- Run the install process for your tool, until it hits some problem.
- Install the required dependency interactively within the container.
- If that advances your tool install process, add that dependency install to your Dockerfile.
- Rebuild and re-enter your container and continue the process.
Tips for making your Dockerfile
- Start with the best base image you can. If your code extends some already Dockerized software tool, start with that as a base image. For R, see rocker. For conda, see miniconda.
- If you are installing dependencies via
pip,R, orconda, go crazy with those, and if you have binary dependencies you may want to use apt. - Keep it clean. Don’t add extra things, because others will be looking at your Dockerfile and using it as a guide for installing your software locally.
- Docker is very clever at caching partial execution, but this can be frustrating if something has been updated remotely. To start from scratch, use the
--no-cacheflag todocker build. - If you want to “shelve” your Dockerfile and still have it work down the road without modification, make sure to use a tag. So, rather than basing your image on
continuumio/miniconda, base it oncontinuumio/miniconda:4.7.10. That way your build won’t break when the base image is updated.
A minimal list of commands
docker build .: build a Docker image from this directory (assuming it contains a Dockerfile)docker run <image>: run an image, executing theCMDline then exitingdocker run -it <image> /bin/bash: run an image and “log into” itdocker exec -it <container> /bin/bash: “log into” a running containerdocker ps -a: shows all of the containers and their statuses
Automated builds
Docker Hub can automatically build your Docker image every time you push to a GitHub or Bitbucket repository. To do so, follow these steps:
- Write a Dockerfile for your project. Test it locally.
- Make an account on Docker Hub if you don’t have one already.
- Add a Docker automated build.
- Add a Docker build badge to your README (see cowsay-test again, changing what’s needed in the paths).
Where to next?
Having your tool in a Docker container enables a few more next steps.
- You can set up your tool in a continuous testing framework that uses Docker, such as Travis, CircleCI or Wercker.
- You can use Amazon’s version of a compute queue, called AWS Batch, to run your tool on large data sets in the cloud.
- To run a Docker image on your local cluster, you will need to use Singularity and convert your Docker image into a Singularity image then run it under Singularity. (Cluster administrators don’t like Docker because it doesn’t have a security model.)
Resources
There is a lot more to Docker than we’ve covered in this post. Here are some good resources.
- Docker basics
- Docker installation
- Dockerfile best practices
- An introduction to Docker for reproducible research, by Carl Boettiger
Thanks
Thank you to Will DeWitt, Jason Vander Heiden, and William Lees for feedback that improved this post.